MAC's Keep It Loose - swatch and review

Released in eight shades last week, MAC's Keep It Loose resonated with me the most.  I honestly think I was still coming down from Something Special's peachy hue; I even checked with a sales associate her thoughts before purchasing.  The main point of difference is Keep It Loose has orange undertones, whereas Something Special leans pink.

The main purpose for this collection's release, I believe, was to break up two major summer collections Hey, Sailor and Heavenly Creatures.  Why not soften the blow by selling a small array of multitaskers?  I liken this to the centre of a Double Stuffed Oreo - light, creamy and the presence of milk is optional.  In Keep It Loose's case, colour can be applied to the lips, cheeks or both! Ultimately, it's all about having options.

In order to cap off my smoky Chanel look, I applied Keep It Loose onto the apples of my cheeks and painted my lips too.  If you don't own a brush similar to MAC's 190 Foundation Brush, your fingers will do.  Keep it Loose appeared dewy and natural on my cheeks, whereas my lips looked washed out and matte; after taking the pictures you'll see here, I freshened up my lips with a bit of clear gloss.

Trying to keep things Loose

Trying to keep things Loose

After taking Keep It Loose out for a test drive last night, I definitely think this peach of a shade makes for a great blush, but I have reservations with using it on my lips again. Personally, I found it to be drying and the colour wasn't all that flattering on my super pigmented lips.

Total amount for MAC’s Keep It Loose:

  • $41.00 AUS and retails for $20.00 USD back in the States.

Value for money spent (performance and quality):

  • 7 out of 10 bags – I should've had it applied to my cheeks before plunking down my moola.

Likelihood to purchase again:

  • Maybe another hue can persuade me to change my mind.  Thoughts?

Like my Chanel-inspired cardigan/blazer?  You can pick one up at your local ZARA; however, I could only find the pullover

version

online.

Chanel Les 4 Ombres in 37 Variation - swatches and review

There's nothing like leading off this review with an image of my mug.  I'm in the process of experimenting with my new camera (a surprise gift I came home to last week) and Pixelmator.  As each entry is written, my blog continues to grow as a result; might as well jump in by throwing a DSLR into the mix.

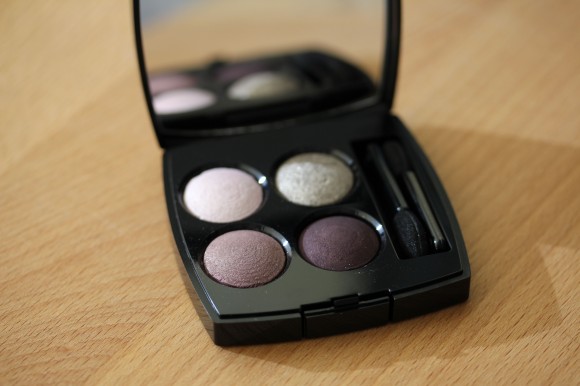
But I digress.  Early last week, Chanel released Les 4 Ombres in 37 Variation here in Australia. Finally, we get the luxury of blogging about something before the States - American lasses will have to wait 'til October or November.  For me, I found Variation reminiscent of Guerlain's quad in Les Perles, yet different enough to warrant this latest purchase :)

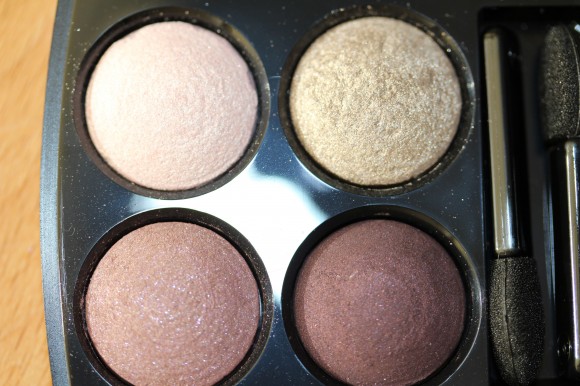
Variation features four shades - pearly pink, golden taupe, dusty mauve and a deep plum.  If the last two colours had a baby, they'd name it Illusoire.

37 Variation

37 Variation

Chanel Variation

Chanel Variation

37 Variation

37 Variation

What drew me to this quad were the two purple hues featured on the bottom row, because purple has a way of accentuating hazel eyes.  Plus, I really wanted to experiment with their powder formula in order to see how well it applied when doing my own makeup.  I only had to make a couple of passes from each pan for the colour payoff you see above - a little goes a long way; just make sure you tap your brush before bringing it to your eye.  This extra step drastically reduced fallout and clean up.

If you want to recreate the look you see above, simply follow these steps:

  1. 1. Start with an eye primer of your choice and apply all over.
  2. 2. Apply the light pink shade all over your lid - lash line to brow bone; I used MAC's 217.
  3. 3. Then apply the mauve hue (lower left) on your lower lid - ditto above brush.
  4. 4. Grab a fluffy angled eye brush and pick up a bit of the plum and concentrate on the outer half of your lower lid.
  5. 5. Next go in with the taupe and line the inner lash line while blending up and into the mauve and plum.  Inglot's 8OHP did the trick.
  6. 6. Last, create a cat eye effect with any liquid/gel liner.  I used MACs' Macroviolet and brush 208.

*Quick tip I learned from the ladies over at the Beauty Dept.:  Apply nude liner on your waterline; this makes your eyes look larger.  And yes, I ran out and purchased Stila's Kajal liner in Topaz after reading about this tip.

If you enjoy shimmery eyeshadow and are a rabid Chanel fan, then it's worth taking a trip to your local department store. Make sure you make a beeline for your Chanel counter and ask about the newest Les Expressions de Chanel collection.  There are few re-promotes and fortunately Variation is a new addition.

The Bagful breakdown:

Total amount for Chanel's 37 Variation Eye Quad:

  • $98.00 AUS; it'll retail for $58.00 USD once it hits a counter near you in the US.

Value for money spent (performance and quality):

  • 8 out of 10 bags – I'm a Chanel convert, even though it's so expensive!

Likelihood to purchase again:

  • I can't wait to check out this!  However, I don't know if I need another face illuminator/highlighter.

Maybelline Color Tattoo Eyeshadow – review

Maybelline Color Tattoo Eyeshadow

Maybelline Color Tattoo Eyeshadow

Go big or go home - that's my motto.  I threw myself in, head first and tested Maybelline's Color Tattoo Eyeshadows last Saturday night. Let's just say I wasn't disappointed.

As promised, I used primer on my primer right eye and skipped it on the left.  After the primer went on, I lightly dusted Urban Decay's Sin from my lash line and stopped at my brow bone.  Then I used Maybelline's Bad to the Bronze and applied it on my eyelid and crease while making sure I blended upwards in order to create a brownish smoke/halo.  With Bold Gold I concentrated on the inner half of my eyelid and Edgy Emerald went on the outer quarter; I wanted to make sure you could still see a bit of Bad to the Bronze.  As for Painted Purple, I lined my lower lash line; starting a quarter of the way in and then winged out in order to meet up with the black liner along my upper lash line. Finally, I added a coat of Benefit's They're Real to my lashes.

Unwittingly, I ended up creating a subtle peacock feather look.

In terms of overall performance, Maybelline's Color Tattoo Eyeshadows certainly stepped up to the challenge.  They are easy to apply - believe it or not I used my fingers to apply them.  Also, they blend together easily, but make sure you act fast or you'll run the risk of setting the colours.  In other words, these babies dry fast!  In the future I think I'd skip applying a powder eyeshadow as a base, because I think its presence was unnecessary.  If you want to highlight your brow area, go in after applying the cream shadows.  Primer was a non-issue, as these colours stayed in place all evening - I say skip the primer.

Here's one final look...

One final note, I wore this look for approximately 8.5 hours; together we weathered a cold and rainy Saturday in Melbourne.  Creasing was non-existent and the colours looked as vibrant as they were when first applied.

The Bagful breakdown:

Total amount for Maybelline Color Tattoo Eyeshadow:

  • $11.95 AUS per jar; $47.80 for all four

Value for money spent (performance and quality):

  • 10 out of 10 bags – unequivocally they've reached HG status.  They are affordable and live up to the hype.

Likelihood to purchase again:

  • This should sum things up..
Tenacious Teal and Too Cool

Tenacious Teal and Too Cool

Essies' Bangle Jangle and Pure Pearlfection - weekly nail review

Bangle Jangle under Pure Pearlfection

Bangle Jangle under Pure Pearlfection

This week I carried on with Bangle Jangle, first cousin to St Lucia Lilac.  Bangle Jangle was so popular [insert sarcasm here] I couldn't even find it on Essie's site; I'm guessing it wasn't a hit within their winter 2011/12 collection.  Nevertheless, I put my own spin on this smoky colour by adding a layer of Pure Pearlfection; the silver micro glitter gave Bangle Jangle that je ne sais quoi.

Purple and silver

Purple and silver

Wintertime shimmer

Wintertime shimmer

In other news, when I went poking around Essie's site I stumbled upon Stroke of Brilliance. If you enjoyed A Cut Above and Set in Stones, then you will be a fan of this blue hued hexagonal glitter. Haul of Fame does a great job of showcasing Stroke of Brilliance's ability to transform any shade.